The Raw Ingenuity Trap

1. Introduction: Getting Carried Away with Our Creations

In software engineering, it’s routinely true that engineers can get carried away building things in a complex way that could be simpler. It’s easy to do — and for creative and inventive people, it’s actually delightful. We love inventing things. It’s like an adventurer who enjoys hacking their way through a jungle. There may be a paved road a few meters to the side, that would let us make much greater progress, but we delight in hacking away at the foliage because it’s what we’re good at.

What should we do in this situation? How can we make sure we make best progress?

2. Recognising the trap

Ingenuity can be a trap. If you are trying to invent something, and a better answer already exists, then you could be wasting your time.

But, let’s be honest, it’s fun. We’re creative people and it feels great to invent things. It makes us feel (and look) smart. The act itself is enjoyable. And so as pleasure-seeking nerds it’s sometimes the easiest path.

What we need are mental tools. Questions which can help us make sure we’re on track. If you’re navigating, every so often you should (1) stop, (2) orient yourself, (3) consult a map.

2.1 First, Stop

So how do we do the first part? When should we stop?

We need to ask ourselves regularly;

Does this feel complicated right now?
This is your signal. You’re writing a bit of code, and it starts to feel like it’s getting a little too complex for your brain. Or maybe it feels like a delightfully chalenging puzzle. Maybe that’s OK, and you need this particular bit of complexity. But maybe not. But the feeling of complexity should be like a yellow traffic light — not a red, but you should probably take your foot off the accelerator for a moment, and hover over the brake.

2.2 Second, Orient Yourself

Now that you’ve paused, perhaps ask this;

Is the complexity mine?
By which I mean — is this complex because your current problem genuinely demands it? Or is it accidentally complex, because you are lacking a simpler way to express the problem?

To illustrate, here’s an example. Recently I found myself writing a small app which connected to the serial port of an arduino, and talked to it using a custom protocol. That meant that my program needed to

discovering connected devicessending and receiving bytes along the wiresending requests using the protocolreceiving responses using the protocol
Now, (1) and (2) are ‘someone else’s’ — other people have needed to discover USB devices, and connect to a serial port. I should not spend time here. (3) and (4) are the specifics of my program.

2.3 Third, Consult a Map

So if the complexity isn’t yours, then you need to pump the brakes and ask;

How has this been solved elsewhere?
Note the assumption — it has been solved elsewhere. Because almost always, ten thousand other tems have needed what you need, and the problem has been discovered, studied, optimised, distributed, documented, and commoditised.

Or in other words, you do not need to write an crap event bus.

In the immortal words of Greenspun’s Tenth Law:

Any sufficiently complicated C or Fortran program contains an ad hoc, informally-specified, bug-ridden, slow implementation of half of Common Lisp.
So make sure you’re not making that mistake.

Here are a couple of examples;

Example 1: text search Let’s say you find youself searching for a pattern within some text, and you’re writing code like this;

// extract all the digits at the start of the string
digits = []
for c in string:
if c.is_digit()
digits.push(c)
else
break
Then you might know that you can use regular expressions. Of course you can do it yourself, but a regex might be the way to go. This is probably not your complexity. Note the complexity, note it’s not yours to solve, find another approach.

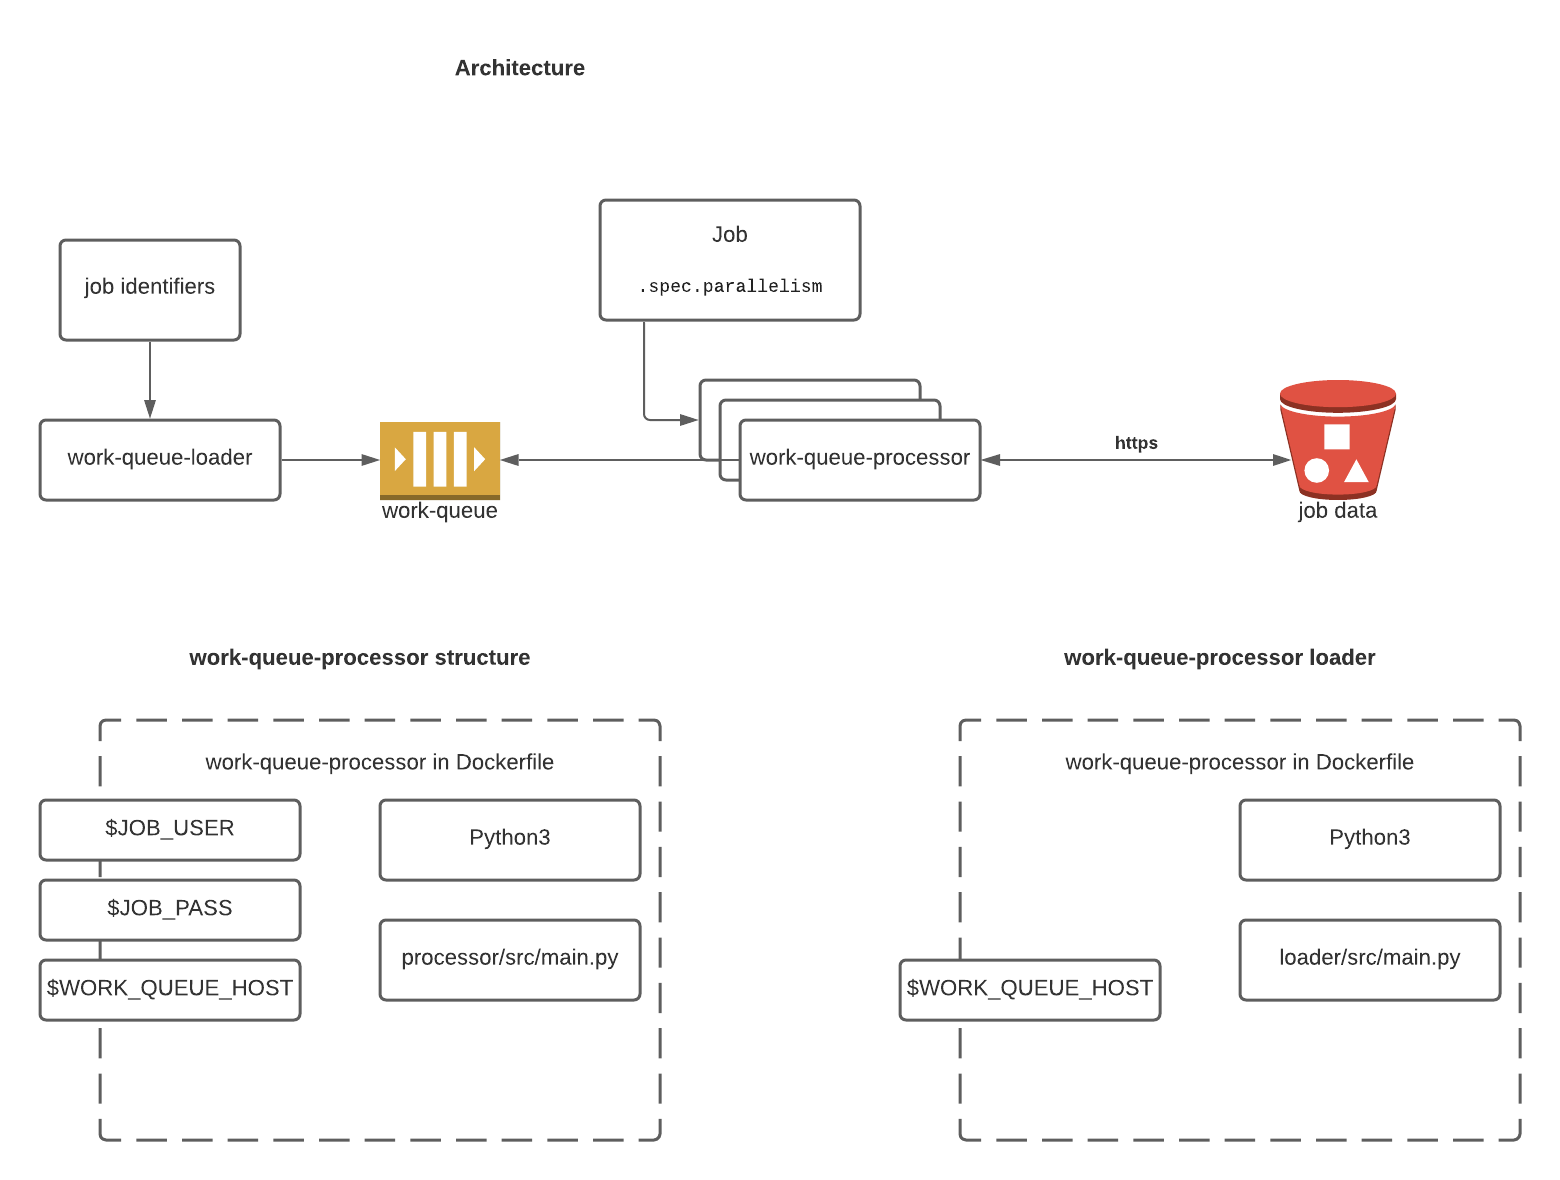
Example 2: parallel tasks. Another example. You’ve written some code to process a big batch of data. And your code currently maxes out one CPU but isn’t using the whole machine. You think you can improve throughput by … something with threads?

At this point, you can probably recognise that you’re not the first person to want to maximise the efficiency of a machine. You’re not the millionth person to want it. And so there will be a solution out there — indeed, many approaches.

Whether you go for threads, async tasks, worker pools, message queues, event busses, map-reduce jobs… this again isn’t your complexity. You should be picking a solution off the menu, not inventing a new recipe

The key takeaway is this;

Someone solved this in 1987 and you forgot a fix existed.

3. Developing as an Engineer

So as a developing engineer, there is a kind of dialog we need to have with ourselves;

This is quite complicated and I feel like I might be getting lost in the weeds. What other system or technique should I be using instead of using raw ingenuity?
And here’s what you should be understanding as you develop.

When you start programming, you rely on raw ingenuity because you know no better. You might write that string search by iterating characters because you’ve never heard of regex. You might try to manage a Vec with a spinloop because you never heard of a Semaphore.

So, developing as an engineer is characterised by building a mental list of the systems or techiques that could be used in any particular situation. More junior engineers need to learn low-level patterns of software. From functions and strings, through objects, through design patterns, etc. You learn about libraries you could use instead of writing your own. You learn about concepts, like regular expressions, that save you from writing complex code.

Senior engineers are those learning about how to structure larger pieces of software, into modules and microservices, and how to build software that is more observable and operable.

Architects learn about cooperating pieces of software such as custom services, message queues, database, etc and how you can avoid writing new software by reusing known enterprise software patterns.

So the career path of an engineer involves becoming aware of other systems, and being confident enough in how they work to be able to substitute them for raw ingenuity.

4. Conclusion

Ultimately, engineering is about delivering value, not flexing creativity for its own sake. Raw ingenuity, while fun and occasionally necessary, can become a detour if you ignore well-worn paths that already solve the problem. Your career progress is really constrained by what you know about existing patterns, tools, and platforms. The real art is in knowing when to pause, observe complexity, and consult the “map” of solutions around you. Recognizing this balance is what separates engineers who merely enjoy invention from those who deliver outstanding, maintainable, and timely results.

Bash File Descriptor Trick

Here’s a little bash trick you might not be aware of.

If you wrap a command in <( and ), you get back something that looks like a file name;

$ echo <(ls)

/dev/fd/63

now, that’s not a file, but a file descriptor – a temporary path that unix programs can be tricked into treating like a file.

For example, you can cat the file descriptor just as you would a file:

$ cat <(ls)

Applications
Desktop
Documents
Downloads

So cat thinks it’s reading a file – cat /dev/fd/63 – but it’s actually streaming the output of a command.

So with this trick, any program that takes a file parameter can take a command output. Eg;

  • curl some web content
  • use find or ls to describe files
  • use sed, awk, and grep to modify an existing file

This can be useful when you have a program that takes multiple input files, like diff;

$ diff <(ls src) <(ls src.bak)

3d2
< canto34-syntax.test.ts
5d3
< canto34.test.ts
7d4
< example.test.ts

So here I’ve listed the contents of two directories of source files, and I can see that src has three more files in it than src.bak. Now that’s hard to do otherwise!

Or consider this example – I’ve got two files I know differ only by indentation:

$ diff src/example.ts src.bak/example.ts | wc -l
      82

so, lots of differences. But can I prove they’re the same after trimming?

$ diff <(sed 's|^ *||' src/example.ts)  <(sed 's|^ *||' src.bak/example.ts)

<no output>

Ok then! I’ve used sed to trim leading whitespace from both files, and now the diff is empty – the files are basically the same.

Does rustc perform better on a ramdisk? (no)

So, rust is slow to compile (see https://vfoley.xyz/rust-compile-speed-tips/ for some background) and I thought it’d be interesting to see if disk i/o made a big difference on a moderate project. Would writing to a RAM disk speed things up?

Quick answer – nope. Not at all.

The approach was to run this clean build and time it;

rm -rf target/* && time cargo build

For the disk runs, nothing clever – just as normal, with target as standard directory on the SSD.

For the ram disk runs, I wrote a little script to prepare a ram disk – see this gist – and created a 6Gb ram disk to serve as the target dir like so;

cd "$HOME/src/my-rust-project/workspaces"
mv target target.disk
create-ram-disk 6 "$HOME/src/my-rust-project/workspaces/target"

The summary – it’s no different. At all.

# Results
DISK1: real   2m28.139s | user   22m20.473s | sys   1m49.867s
DISK2: real   2m35.500s | user   23m7.738s  | sys   1m55.345s
RAM1:  real   2m37.218s | user   22m43.319s | sys   1m53.874s
RAM2:  real   2m27.837s | user   22m58.143s | sys   1m56.239s

Well, maybe that saves you an afternoon of mucking about, or gives you enough info to waste some of your own time 🙂

Flight Simulator 2020 – Building a shared remote cockpit environment

My dad and I both like to play Flight Simulator 2020. Dad got his private pilot license some years back, and although he doesn’t fly any more, he’s a keen simmer. I always loved playing the early flight sim versions back in the day, and I’ve now bought into the game and am playing as if I’m learning to fly for real.

Given our shared interest, and given the isolation of COVID, it made sense to ask – can we fly together? How can we hook up our computers so that we are both in the same cockpit, one in the role of captain, one in the role of copilot? Here’s my initial attempt – hopefully we’ll figure out more as we go!

Stage 1: Just Zoom screen sharing

(For download here, “Zoom client for meetings”)

When you think about it, you can get quite far with just a copy of Zoom and doing a bit of screen sharing – the captain does everything, the copilot watches and can help with navigation, double-checking, looking up airports and frequencies, and calling them to the pilot. Rudimentary, but still quite fun. But, can we take it futher.

Stage 2: Sharing a flight plan with SkyVector

(Online here)

Not a ‘flight control’ solution, but worthwhile.

Skyvector lets you plan flights ahead of time: the idea is that you can file flight plans with Air Traffic Control, but it’s really useful to knock out a flight plan ahead of time, and then share it with the other pilot. This is quite fun for the copilot – who always gets the short end of the stick anyway – because they can plan flights and decide where you go.

Anyway, here’s an example flight plan, an hour’s flight around Iceland:

There are tutorials out there, but the ten-second tutorial goes;

  • open ‘flight plan’ by clicking ‘flight plan’ in the top left corner
  • right-click near an airport or nav aid and choose it to add it to your flight plan: you can add airports, nondirectional beacons, VORs, arbitrary GPS points etc.
  • when you’re done, share the flight plan by email – click the fourth icon on the flight plan toolbar, choose email, and send to your copilot. They can follow the link to see what you see
  • There’s both a map view and a ‘navlog’ view, where you can see directions, nav aid frequences, etc.

Stage 3: Zoom screen sharing with remote control

Zoom lets the host share the mouse and keyboard with another participant. It’s for things like collaborating on a document, but it just about works! The copilot can reach over with their own mouse, flick switches, adjust radio buttons, play with the autopilot.

It’s got it’s challenges – mouse control can be a little funky anyway, and doing it over zoom can lead to unexpected zoom-in / zoom-out experiences, and other little pieces of awkwardness. Still, now you’ve got a navigator who can tune your NAV1 and NAV2, program the autopilot, etc.

It’s also possible to use keyboard shortcuts, so if you know those it can be much more accurate and less fiddly than mouse control.

Stage 4: Shared Tools via MSFS Mobile Companion App and NGROK

(MSFS MCA For download here)

(NGROK For download here)

MSFS is a very neat application for displaying info on your flight, and letting you adjust lots of settings. It includes a live map so you can see where you are, and controls to tune your radios, the autopilot, and simulation rate:

  • Visit the site linked above and choose ‘tags’, or click here
  • Choose the most recent release – that’s 1.3 right now – and download it from ‘Assets’ at the bottom – eg ‘MSFS_MCA_v1-3.exe
  • Start the flight simulator
  • Start the MSFS_MCA_…exe app
  • Open a web browser
  • Visit http://localhost:4000.

Now, the sharing part.

Note that ‘http://localhost&#8217; means ‘my computer’ – the captain can see the content, but the copilot can’t – it’s not their computer to see. You need a way to expose the content on the captain’s computer to the copilot.

That’s where NGROK comes in. NGROK is a tool used by software developers and website designers to expose the sites they write to other folks. So you run the program on your machine, and use NGROK as a kind of ‘periscope’ that other people can look down and see the site running on your computer.

You need to download the ngrok zip to your machine (something like ”ngrok-stable-windows-amd64.zip”) , extract all the files, and start a command prompt;

Then change directory to the one containing ngrok and run

./ngrok.exe http 4000

That’ll start ngrok which’ll look something like this

ngrok by @inconshreveable

Session Status online 
Account Steve Cooper (Plan: Basic) 
Version 2.3.35 
Region United States (us) 
Web Interface http://127.0.0.1:4040 
Forwarding http://0d7e89ae9c5f.ngrok.io -> http://localhost:4000
Forwarding https://0d7e89ae9c5f.ngrok.io -> http://localhost:4000 

Connections ttl opn rt1 rt5 p50 p90 
            0 0 0.00 0.00 0.00 0.00

The important part is the bold part I’ve highlighted – the web address like http://0d7e89ae9c5f.ngrok.io is a place anyone can go to and see that mobile companion app. So, you can let your copilot know about the address (say, in the zoom chat you’ve got going) and they can load the site up on their computer, or iPad, or phone. And now they are truly navigating – they can see your location, tune your radio, whatever – all without trying to fiddle with knobs and dials using a mouse over a zoom call. Much nicer!

But be aware! anyone could also use your application – there’s no protection – so be careful not to share that with other strangers – basically, don’t stream it! It changes every time, so if someone does get hold of it during a session, just stop ngrok and start it again. They may have maliciously changed your NAV2 or sped up your simulation rate though!

Stage 5: to come!

I feel like this is scratching the surface of the possibilities. I’m sure people have solved this locally, and I want to try other software. For me, the most exciting possiblity is that the copilot could actually take control with their yoke. Here’s some software that may be amenable to being ‘copiloted’.

  • SkyShare – SkyShare’s got amazing promise – you can use the copilot’s yoke as a virtual second yoke, giving the possibility of two-pilot control. This would be great. I’ve bought a copy but not managed to get it working yet. There’s a lot of networking cleverness to be done to get it working – not necessarily the kind of shenanigans you really want to get working. I’m hoping to be able to create a solution with ngrok or something, making the complex networking easier.
  • Air Manager – Air Manager is a companion app which lets you connect to the sim and see the instruments in a separate window. I know this works on a local network, but I’ve not tried it over the internet yet. I can see this being really useful in Instrument Flight Rules (IFR) flights where visibility isn’t great, or where the captain is using something like TrackIR or otherwise tends to make it hard to read the instruments.

Code With Me with Tuple – Initial Impressions

A colleague and I have been trying out JetBrains ‘Code With Me’ – a very nice new pair programming plugin for IntelliJ / CLion / etc. It works very well as an adjunct to other pairing solutions like tuple and zoom.

tl:dr; use Code With Me alongside Tuple to get a very slick and flexible coding experience

docs: https://www.jetbrains.com/help/idea/code-with-me.html
download: https://plugins.jetbrains.com/plugin/14896-code-with-me

It allows one user – the host – to share their IntelliJ or CLion session with other programmers. When the partner connects, it downloads an intellij-based client application — not your own local copy of IntelliJ but a new app with the same IDE engine and much of the same tooling.

So then, both of you can code together. You can either use a ‘follow mode’ where you’re both editing the same file and share a cursor, or you can code independently and each edit different files. So, either you’re doing tight pair programming, or one of you is writing tests while the other writes documentation, say. It’s flexible.

So far we’ve found it useful to use both tuple and Code With Me in the same session.

Here’s my first impressions;

Code With Me only shares your IDE session. E.g., it won’t share a browser if you’re web programming or sharing docs.
Code With Me lets you do most things exactly the same as the original JetBrains app, like building, running a Run/Debug configuration, code highlighting, etc. Editing is fast and low-latency.
Code With Me can be left running even if one person is called into a meeting. This is amazing. If I’m called into a zoom call, my partner can keep working. If I’m late getting back from lunch, my partner can work.
Code With Me lets people work on different files at the same time.
– There is a degraded experience when running tasks. When running tests, participants don’t get the nice visualisation with a tree of tests with green ticks — they get stdout. For builds, you can’t click on a compile error to jump to the broken file. This may only be for Rust code in CLion, since people report this works fine for JVM projects.
Code With Me does let the participant request terminal access. That’s nice since it allows someone to kubectl logs or mvn install, etc.
Tuple provides the best synchronisation experience. The participant sees exactly the same as the host, and doesn’t get any of the degraded experience.
Tuple shares much more – other apps, voice and camera.

Extending MSBuild with custom command line tools, Part I – Console Errors

Ever wanted to extend your build process in Visual Studio, but found VS extensions to be bag-of-snakes crazy?

If you work on a decent-sized or complex solution, you’ll probably find yourself wanting to generate some code, or validate an input file, or process some configuration data, as part of your build. For example, I recently needed to validate some JSON files against a complex set of validation rules. If the JSON files didn’t ‘make sense’, then the build process needed to fail. So let’s say we have this JSON file;

capture

Notice how the start date is after the end date, and that doesn’t make sense? I don’t want this file to accidentally go into production, so I want to validate it, and if the problem exists, fail, and fail properly, giving me an error in Visual Studio like this;

capture

So I certainly need to write a piece of code like this;

var fileContent = File.ReadAllText(args[0]);
var file = JsonConvert.DeserializeObject<DataFile>(fileContent);
if (file.StartDate > file.EndDate)
{
    // start date must be before the end date -- fail!
}

But how do insert that into your build process? If you look as Visual Studio’s ‘recommended’ way to do things, it starts to look difficult. You can write your own MSBuild task by inheriting Task, but there’s a lot of ceremony and you have to write the task in a different solution. You can also write an extension, but that’s even harder.

In this post, I describe a small trick that you can use to dramatically simplify the process of writing your own build tools. That makes it simple to write your own tools and have them integrate with the Visual Studio / MSBuild build system. You can find the source code on github.

Outline

Visual Studio detects build errors in a really simple way — it looks at the console output produced during the build process and looks for lines like this;

c:\src\BlogPost\BlogPost\Program.cs(13,17,13,18): error CS0818: Implicitly
  -typed variables must be initialized

So this occurs when I write this code in C#;

namespace BlogPost
{
    class Program
    {
        static void Main(string[] args)
        {
            var x;
        }
    }
}

When I build, Visual Studio runs MSBuild, which runs the C# compiler (csc.exe), which writes to the console; internally, there will be a line like this in the compiler;

Console.WriteLine(@"c:\src\BlogPost\BlogPost\Program.cs(13,17,13,18): err
  or CS0818: Implicitly-typed variables must be initialized");

And visual studio picks up on that line in the output, detects the build error, stops the build, and puts the error into the error window.

And here’s the ‘secret’ — absolutely anyone writing a similar message during the build process gets the same privileges. There’s no API to invoke, no DLLs to register in the GAC, no nothing clever. Just make a console app and have it write messages with Console.WriteLine. You can now handle errors as easily as C# does.

Steps

The code for this post can be found on GitHub.

Step 1: Create your console app.

First, create a new console app. If you’re improving an existing solution, you can just add the app into the solution itself.

Here’s the guts of Program.cs from the console app;

static void Main(string[] args)
{
    try
    {
        var fileContent = File.ReadAllText(args[0]);
        var file = JsonConvert.DeserializeObject(fileContent);
        if (file.StartDate > file.EndDate)
        {
            WriteBuildError("Error", args[0], 1, $"The start date is after the end date");
            return;
        }
    }
    catch
    {
        WriteBuildError("Error", new Uri(Assembly.GetExecutingAssembly().Location).AbsolutePath, 1, $"This tool expects 1 command-line argument");
    }
}

So you can see what’s happening; the main function loading the JSON file, and checking a condition – when that condition fails, it writes out a build error and quits.

That build error method looks like this;

private  static void WriteBuildError(string type, string filePath, int lineNumber, string message)
{
    var msBuildMessage = string.Format(@"{0}({1}) : {2}: {3}.", filePath, lineNumber, type, message);
    Console.WriteLine(msBuildMessage);
}

Simply writing a formatted message to the console.

So now,  you can see that it takes almost no code to write a console app which is going to be ‘compatible’ with MSBuild. Now if you want to do something — like generate content — now’s your chance. Read your input files, build source files, run tests, whatever else it is you want to do — and if there are problems with the inputs, or tests fail, you write out the errors.

So how do you integrate this console app into the build process?

Step 2: Altering the .csproj of your dependent project

So far you’ve written a console app that functions as your compiler, code generator, file vaidator, etc. You’ll also have a project that uses the output of that process — say, if you code-generate some C#, you can have a second project that then compiles it. Here’s an example solution structure;

capture

Solution Structure

We have BlogPost.csproj, which is the tool, and AppThatUsesTheTool. We want to invoke the tool to validate customConfig.json.

We open up the csproj file in a text editor and add this right at the bottom just above the tag;

  <PropertyGroup>
    <MyCustomToolPath>$([System.IO.Path]::GetFullPath("$(ProjectDir)..\BlogPost\$(OutDir)\BlogPost.exe"))</MyCustomToolPath>
    <MyInptuFile>$(ProjectDir)customConfig.json</MyInptuFile>
  </PropertyGroup>
  <Target Name="RunMyCustomTool" BeforeTargets="Build">
    <Exec Command="$(MyCustomToolPath) "$(MyInptuFile)"" IgnoreExitCode="true" />
  </Target>

Now, how does this work?

The <PropertyGroup> tag just defines a couple of properties and sets their content; those first four lines do the equivalent of C# like;

var MyCustomToolPath = System.IO.Path.GetFullPath($"{ProjectDir}..\BlogPost\{OutDir}\BlogPost.exe");
var MyInptuFile =$"{ProjectDir}customConfig.json";

The <Target> tag does the actual work. It extends the C# build with another arbitrary step. We give it an arbitrary name, and then tell it to run before the normal C# build. Inside, we say what we want to happen; we run the task, which just executes a batch command, and we feed it the path to BlogPost.exe, our command-line tool, passing it the file we want to validate. BlogPost’s Main method receives that as `args[0]`.

So now, we’re done. If you build the solution and the JSON file is invalid, BlogPost.exe writes the console error, the solution fails to build and you see a build error in Visual Studio;

capture

And you can double-click the error and it’ll jump into customConfig.json, just as it would in a C# file with a syntax error.


Canto34 parsing toolkit v2.0.1 released

I’ve updated my JavaScript toolkit for building recursive-descent parsers to ES2015, and updated it to v2.0.1. It’s on npm and github. The readme explains how to use it.

I’ve also just found out that Visual Studio 2015 Update 1 supports TextMate grammars — and Canto34 produces them. So you can write yourself a language, and use its lexer inside Visual Studio. This makes it great for producing DSLs like custom configuration files and testing languages. You’ll want to use the canto34-syntax.js code to produce a .tmLanguage file, and install it into Visual Studio using this tutorial.

Developing ASP.NET IIS Applications: Triggering LiveReload on a successful Visual Studio or MSBuild build

I’m all about getting rid of the friction in development. All that ‘ceremony’ that ends up built into your muscle memory to get your projects built and running.

One bit of small friction, but one you pay regularly, is pressing F5 in web applications, reloading the page after you’ve changed the source code. LiveReload is a really nice solution to that when you’re editing JavaScript and HTML, and in ASP.NET MVC when you’re editing Razor (CSHTML) files.

However, the job isn’t all done, and when you’re making server-side changes — changing controllers and such — LiveReload isn’t as easy to make fire. You really want it to trigger when it finishes a build, once all your binaries are up to date. I decided to fix that with a very small MSBuild target. The idea is that you add this into your web app (manually stitching it into your CSPROJ file) and when you build your source, it writes a small random file to disk. You use LiveReload to watch for that file, and that will trigger your browser to refresh. It’s a small — very small — improvement to your workflow if you’re already using LiveReload, but it’s something you do so often that any time you can get rid of a tiny piece of friction, you save yourself a little bit of the mental capacity you use for concentrating on real problems. In a very real way, each little bit of friction steals an IQ point or two; hoard them for the difficult tasks! As Alfred North Whitehead said:

“It is a profoundly erroneous truism, repeated by all copy-books and by eminent people when they are making speeches, that we should cultivate the habit of thinking of what we are doing. The precise opposite is the case. Civilization advances by extending the number of important operations which we can perform without thinking about them. Operations of thought are like cavalry charges in a battle — they are strictly limited in number, they require fresh horses, and must only be made at decisive moments.” – ANW

You need to get LiveReload into your workflow. I’ve found the best for me is to use Grunt or Gulp, both of which are designed to work with LiveReload. On windows, it’s been the most reliable way for me to get it to run — the original app is an alpha version, there’s not been an update in a long time, and I’ve found it flakey.

So here’s what you need to do;

Make sure you’ve got node.js installed

Come on now. Get it if you haven’t already. Nodejs.

Create a package.json file in your solution directory.

If you don’t already have a package.json file, open a command window, change directory to your solution folder, and type

npm init

And hit ‘enter’ a bunch of times.  The defaults are fine, but you may need to type your project name in, in lower case, if it complains about your folder name.

Install Grunt and Grunt-Contrib-Watch

Now install Grunt, the task runner, and Grunt-Contrib-Watch, a package which watches for file changes and triggers useful work.


npm install -g grunt-cli
npm install grunt --save-dev
npm install grunt-contrib-watch --save-dev

Nice and straightforward!

Create a Gruntfile

In your Solution directory, create a file called Gruntfile.js. (Note the capitalisation.) Then add this to it;

module.exports = function(grunt) {

var reloadTokens = ['{{MyWebProjectFolder}}\LiveReloadOnSuccessfulBuild.token']

grunt.initConfig({
  watch: {
    files: reloadTokens,
    options: {
      livereload: true,
    }
  }
});

grunt.loadNpmTasks('grunt-contrib-watch');
grunt.registerTask('default', ['grunt-contrib-watch']);

};

Alter the file — you’ll see on the second line the token {{MyWebProjectFolder}} which you should replace with the relative folder path from your solution to your web application folder. Normally that’s the name of the project in Visual Studio. This is the config file that tells Grunt to watch for a file called ‘LiveReloadOnSuccessfulBuild.token’, a file that gets generated by a little bit of MSBuild trickery you’ll see in a minute. This file needs to go into source control.

Create the MSBuild target file

In your web application folder — the same folder that holds your CSPROJ file — create a file called LiveReloadOnSuccessfulBuild.targets and put in this content;

<Project xmlns="http://schemas.microsoft.com/developer/msbuild/2003">
 <ItemGroup>
 <!-- trick from https://blogs.msdn.microsoft.com/msbuild/2005/10/06/how-to-add-a-custom-build-action-to-visual-studio/ -->
 <AvailableItemName Include="UpdateOnSuccessfulBuild" />
 </ItemGroup>

<Target Name="LiveReloadOnSuccessfulBuild" AfterTargets="Build">
 <!-- If you're using LiveReload, you want your pages to reload 
 after your web app compiles. This add a build action, 
 "UpdateOnSuccessfulBuild", which you can use to mark a 
 dummy file. The build action writes a random guid to 
 the file within your web app folder; this can be watched 
 for in your Gruntfile.js, gulpfile.js, or by the 
 LiveReload app. -->
 <Message Importance="High" Text="Writing LiveReload token to LiveReloadOnSuccessfulBuild.token" />
 <WriteLinesToFile
 File="LiveReloadOnSuccessfulBuild.token"
 Lines="Live Reload Token: this changes on a successful build, to trigger LiveReloads. Exclude from source control! $([System.Guid]::NewGuid().ToString())"
 Overwrite="true"
 Encoding="Unicode"/>
 </Target>
</Project>

This is an MSBuild file — the same stuff that runs when you build your solution — and it instructs the build process to create a file called ‘LiveReloadOnSuccessfulBuild.token’ whenever the build completes. The Gruntfile I described earlier watches for this file, and when it finds it, it sends a signal to LiveReload to reload your page. This needs to go into source control.

Wire up the targets file into your web app build process

We need to wire this targets file up into visual studio’s build system. Open your web application’s CSPROJ file in a text editor, and on the penultimate line, just above </Project>, put this;


 <Import Project="$(ProjectDir)LiveReloadOnSuccessfulBuild.targets" />

Save the file, and if prompted in visual studio, allow it to reload your web app.

That’s all the editing done. Now, when you build in Visual Studio, it will alter the ‘LiveReloadOnSuccessfulBuild.token’ file and put something like this in;


Live Reload Token: this changes on a successful build, to trigger LiveReloads. Exclude from source control! ad7c25b3-dcfa-4571-98d9-ad9936c1e1d8


As it says, you may want to make sure this file isn’t checked into source control — if you’re using TFS, you don’t need to do anything, but if you’re using git, you may want to put it in your .gitignore file.

Install LiveReload extension in Chrome

When LiveReload works the way it does it is to watch your files, and when a change is made, it sends a signal. But what listens for the signal? You need to install an extension in Chrome.

use it!

OK, so we’re almost there. With a command window open in your solution directory, enter

grunt watch

That is, ‘run grunt with the ”watch” command’. If you look back at the grunt file, you’ll see that ‘watch’ is configured to look for that token, and send the signal to your browser.

Now that that’s started, on Chrome you’ll need to start the LiveReload extension watching for the signal. There’s ‘reload’ icon on the same line as the web address, with a little hollow circle surrounded by looping arrows. When you click it, the hollow circle is filled in, showing that the browser is connected to LiveReload. Be aware that it’s trying to connect to the LiveReload server you started with grunt watch, so you need to do it in that order — grunt, then browser.

We’re done! Now, whenever you build your web app, it will automatically refresh the browser. Although this was a bit of a slog, we’re now in the position where you don’t have to refresh your browser. If you have two monitors, you can code in one window and watch the web app develop in the other. Saves you mental energy and the RSI of constantly flicking your hand to the mouse!

Syntax highlighting added to Canto34

I’ve just extended my parser toolkit, canto34. Canto 34 is a library for building recursive-descent parsers. It can be used both on node.js, and in the browser as an AMD module.

Starting in v0.0.5, I’ve added a function to let you generate a `.tmLanguage` file. This is the syntax highlighting system of TextMate, Sublime Text, Atom, and Visual Studio code.

This is actually pretty sweet; it makes your language feel a bit more ‘first class’ when you get the richer IDE experience.

You first generate the file content, then save it wherever your text editor demands. For example, To use it with Sublime Text 3 on windows, call code like so, swapping `{myusername}` with the name of your user account;

 var content = canto34.tmLanguage.generateTmLanguageDefinition(lexer);    require(‘fs’).writeFileSync(“C:\\Users\\{myusername}\\AppData\\Roaming\\Sublime Text 3\\Packages\\User\\myparser.tmLanguage”, content);

This will write out a syntax highlighting file into your User folder, which is a personal ‘dumping ground’ for configuration bits and pieces on your machine for Sublime Text. When you restart ST, you’ll see your language in the list of language options, displayed in the bottom-right.

You’ll need to configure the tokens in your lexer a bit more. For example, if you have a variable name token, you’ll need to tell the lexer that this should be highlighted one way, and if you have a keyword like ‘for’, you’ll use another. Do this with the `roles` option on a token type;

    lexer.addTokenType({ name: “comment”, ignore: true, regexp: /^#.*/, role: [“comment”, “line”] });

lexer.addTokenType(types.constant(“for”,”for”, [“keyword”]));

lexer.addTokenType(types.constant(“[“, “openSquare”, [“punctuation”]));

lexer.addTokenType(types.constant(“]”, “closeSquare”, [“punctuation”]));

The list of roles isn’t clear to me – I’ve just figured out some key ones like `keyword`, `comment`, and `punctuation` from reverse engineering existing `tmLanguage` files.

Find out more on GitHub or NPM.